Docs › Using Zalosim
The interface
Zalosim is organised the way process simulators usually are: you set up the fluid first, then build and solve the flowsheet. This page names every part of the screen.
The three environments
Work moves through three environments, shown as steps in the middle of the top bar: Start, Properties and Simulation. Tap a step to move between them. A small tick on a step means that part is done.
| Environment | What you do there | Available when |
|---|---|---|
| Start | Start a new case, open a sample, starter case or saved case, or begin a guided exercise. | Always |
| Properties | Choose components and the fluid package (see Components and fluids). | A case is open |
| Simulation | Build the flowsheet on the PFD, enter conditions and read results. | The case has components and a fluid package |
If you tap Simulation before the fluid is set up, Zalosim says Choose components and a fluid package first. With a keyboard, Ctrl+1, 2 and 3 jump to the three environments, and Ctrl+L returns to the previous one.
The Start page
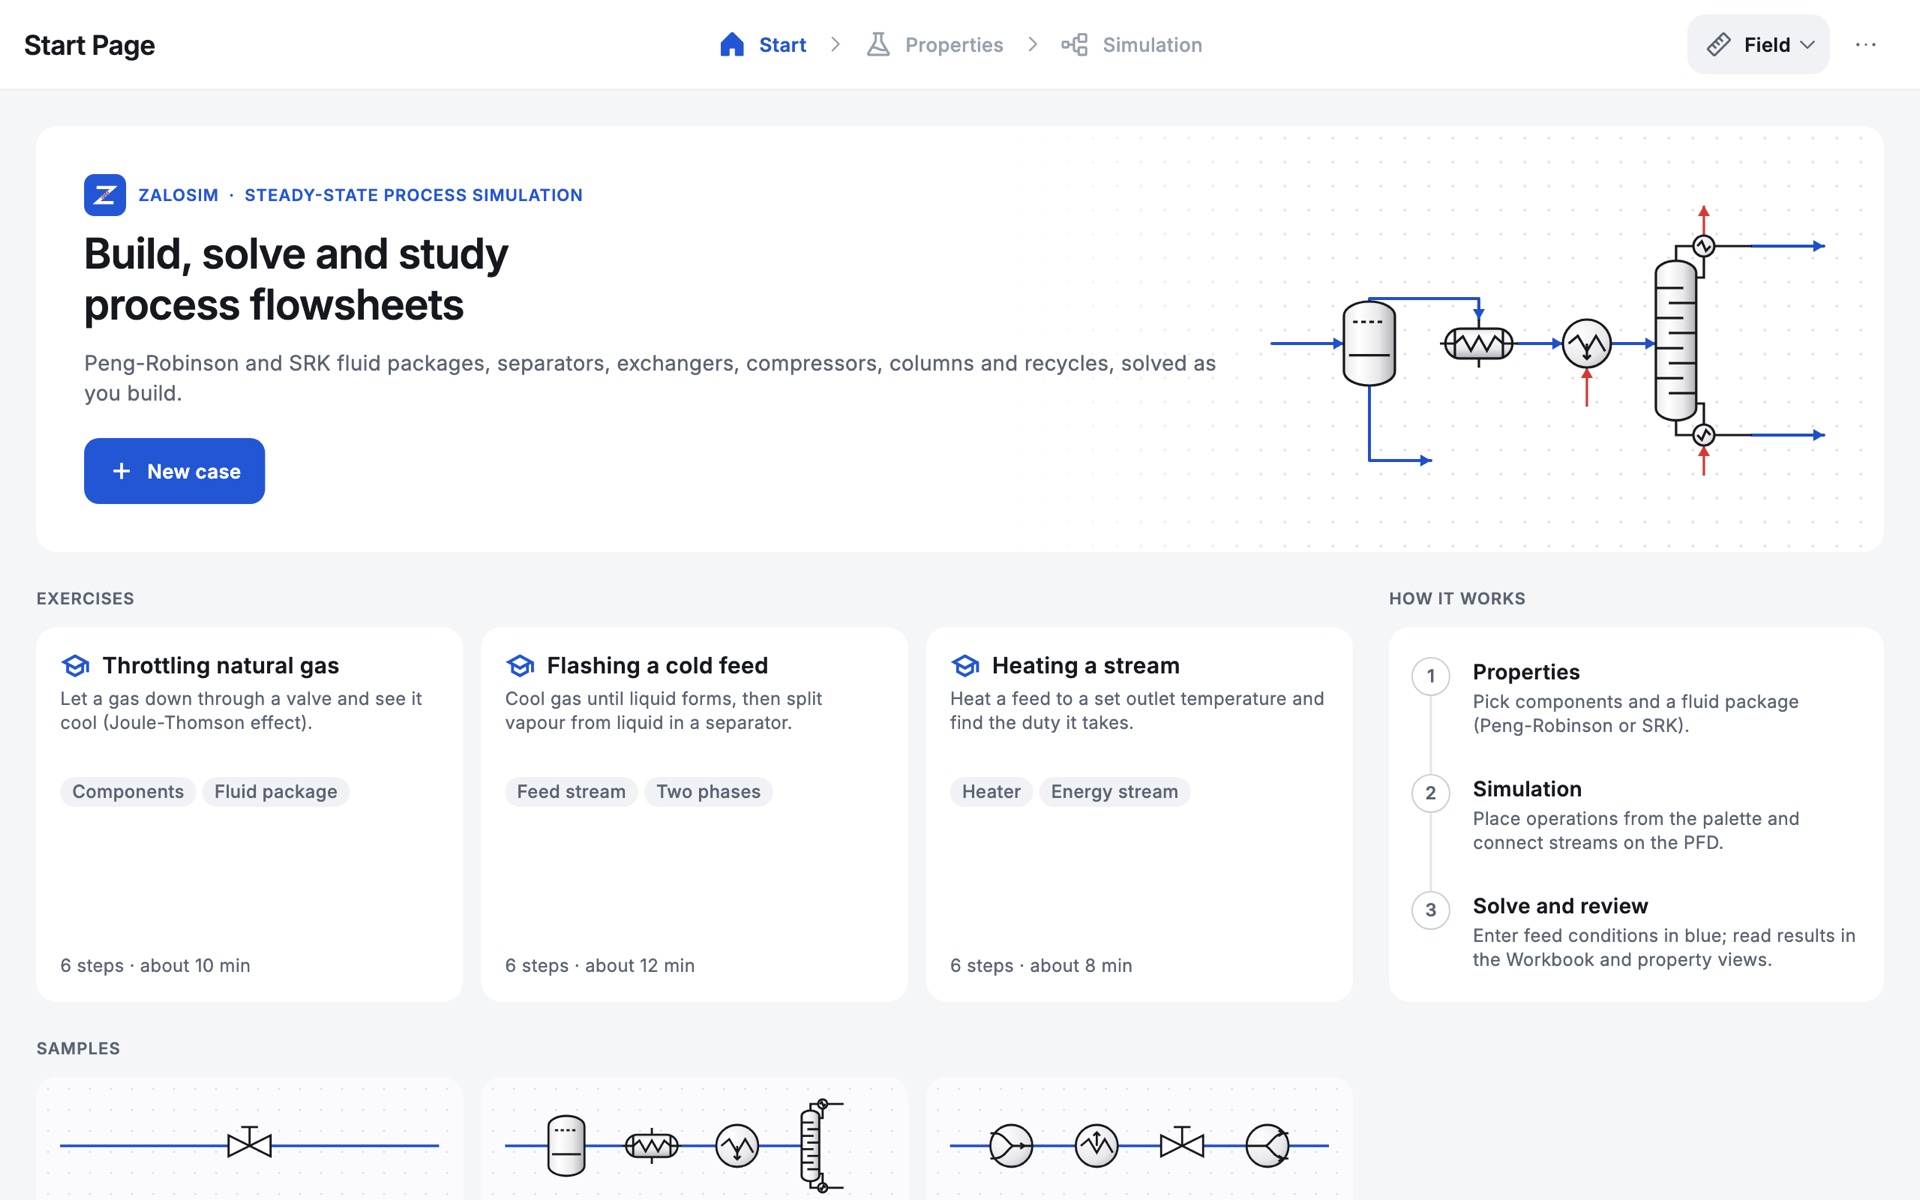
- New case opens an empty case in the Properties environment.
- Open case appears when a case is already open, with its status and a Continue button.
- Exercises and Oil & gas exercises start a guided build (see Tutorials). A card shows your progress, for example In progress · step 3 of 6.
- Samples and Oil & gas starter cases open a finished case, go to the Simulation environment and solve it.
- Saved cases lists the cases saved on this device, newest first. Tap one to open it. See Files and reports.
Opening a case from the Start page replaces the case you have open without asking. Save first if you want to keep it. (Ctrl+N and Ctrl+O do ask before discarding unsaved changes.)
The top bar
From left to right:
- Case name. Tap it to rename the case. An Unsaved tag appears beside it when there are changes you have not saved.
- Environment steps: Start, Properties, Simulation. On narrow screens they show as icons only.
- Undo and Redo (arrows). Zalosim keeps the last 50 changes to the case.
- Instructor tag, shown only while instructor mode is unlocked.
- Unit set button (a ruler and the set name, for example Field). See Units.
- Save. The first save asks for a file name.
- More (⋯): Save As…, Report (PDF), the object style (Shaded objects or Flat objects), the theme (Light theme, Dark theme, System theme), Exercise workbook (PDF), Cloud backup (when available), Keyboard shortcuts and About.
The Simulation environment
Navigator pane
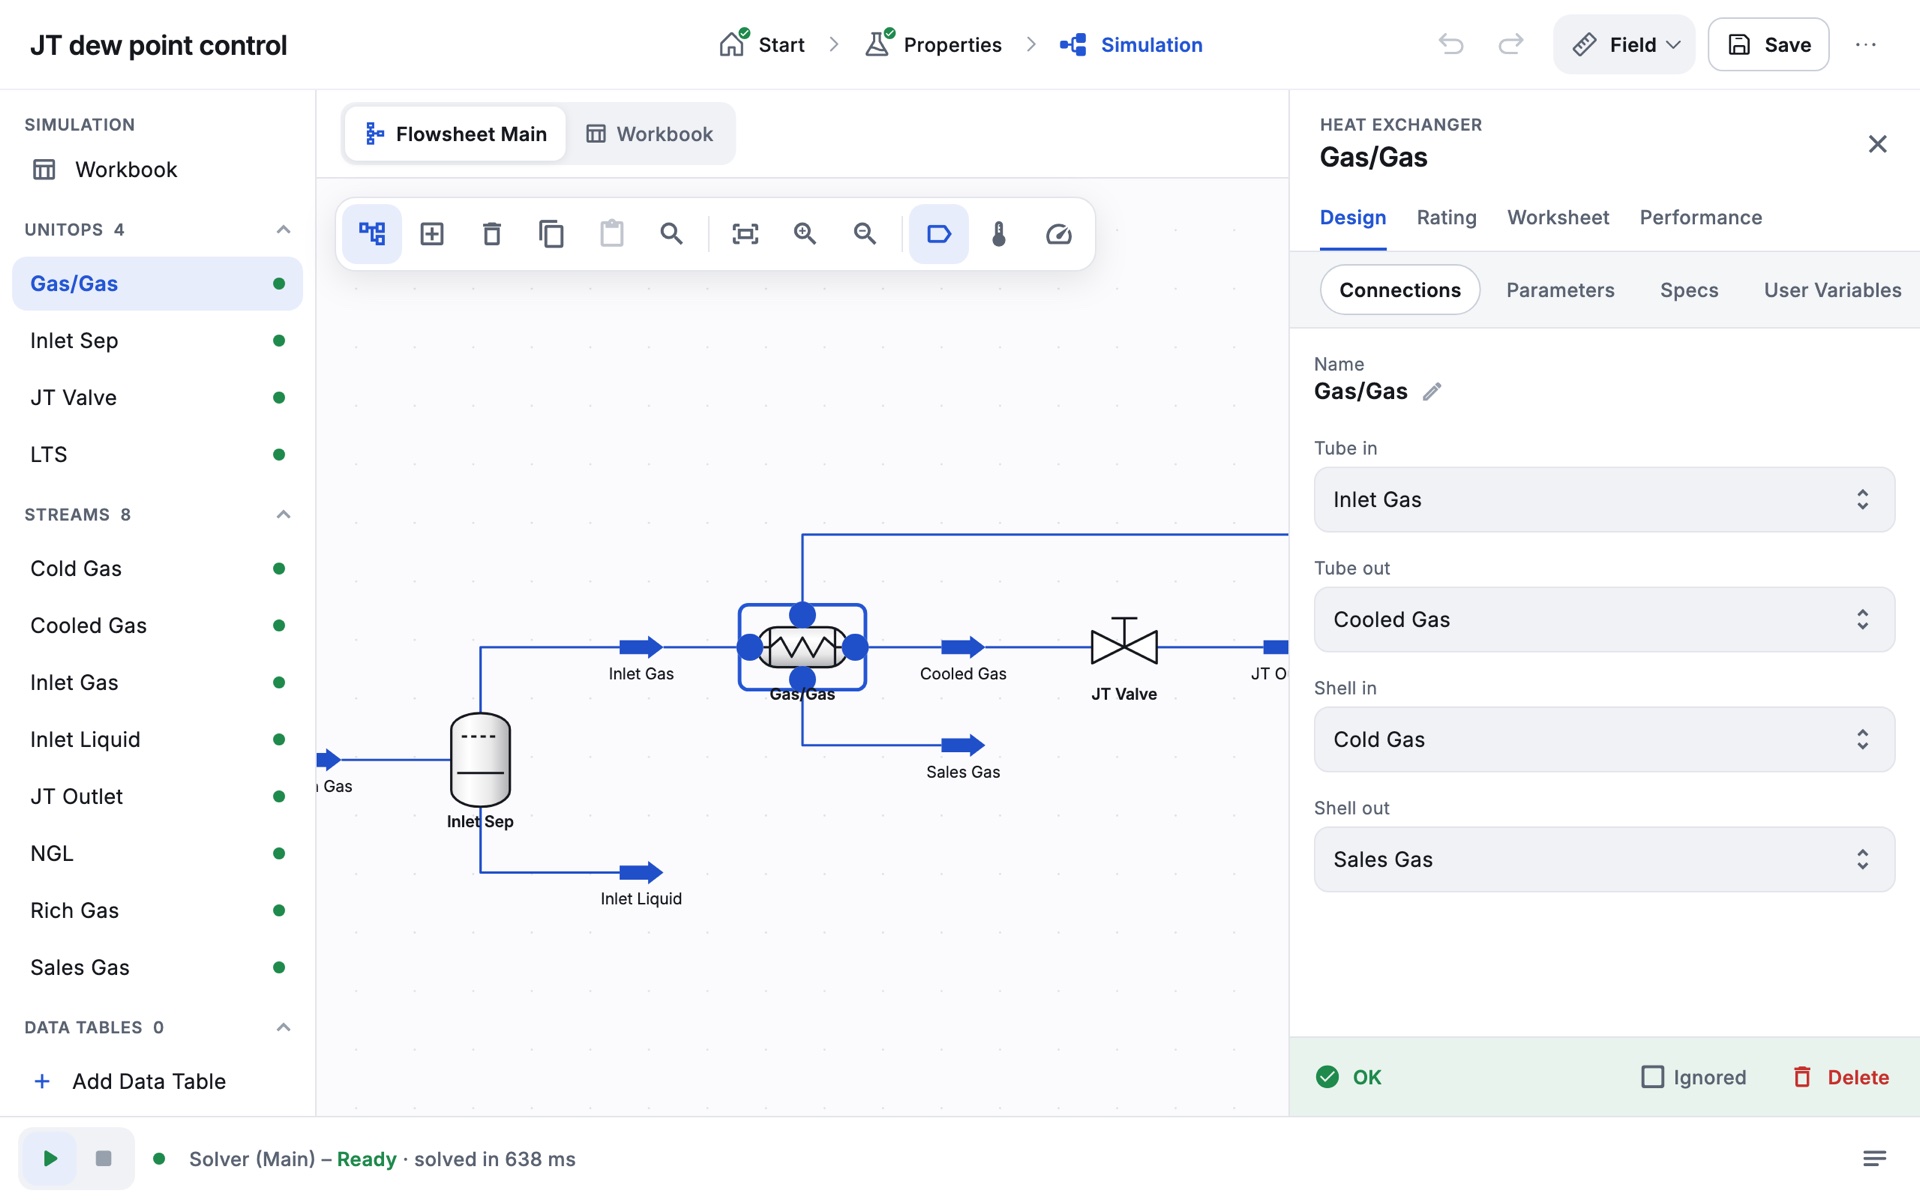
The pane on the left lists everything in the case, grouped under Workbook, UnitOps, Streams (material and energy streams together; energy streams have a lightning icon), Data Tables, Case Studies and Stream Analysis. Each object has a status dot: green for solved, amber for missing information, red for an error and grey for ignored. Tap an object to select it, centre it on the PFD and open its property view.
Show or hide the pane with the Navigator pane button in the PFD toolbar. It also hides itself when the screen is too narrow to keep a usable PFD beside it, and it starts hidden on phones.
PFD and Workbook
Two document tabs sit above the drawing area: Flowsheet Main (the PFD) and Workbook, a table of every stream and operation. Ctrl+P shows the PFD, Ctrl+W the Workbook, and Ctrl+Tab switches between them. The Workbook is described in Streams.
PFD toolbar
The toolbar floats at the top left of the PFD. Hold a button (or rest the mouse on it) to see its name.
| Button | What it does | Key |
|---|---|---|
| Navigator pane | Shows or hides the navigator pane. | |
| Object palette | Opens or closes the palette of streams and operations. | F4 |
| Delete selected | Deletes the selected objects. A message offers Undo. | Delete |
| Copy selected | Copies the selected objects. | Ctrl+C |
| Paste | Pastes renamed copies beside the originals. | Ctrl+V |
| Find an object | Opens the Navigator search: type part of a name, tap a result to select and centre it. | F3 |
| Zoom to fit | Fits the whole flowsheet on screen. | Home |
| Zoom in / Zoom out | Zooms by a fixed step. | Page Up / Page Down |
| Labels | Shows or hides object names. | Shift+N |
| Show T and P on streams | Writes each solved stream's temperature and pressure beside it. | Shift+T |
There is no Cut button, but Ctrl+X cuts the selection.
Object palette
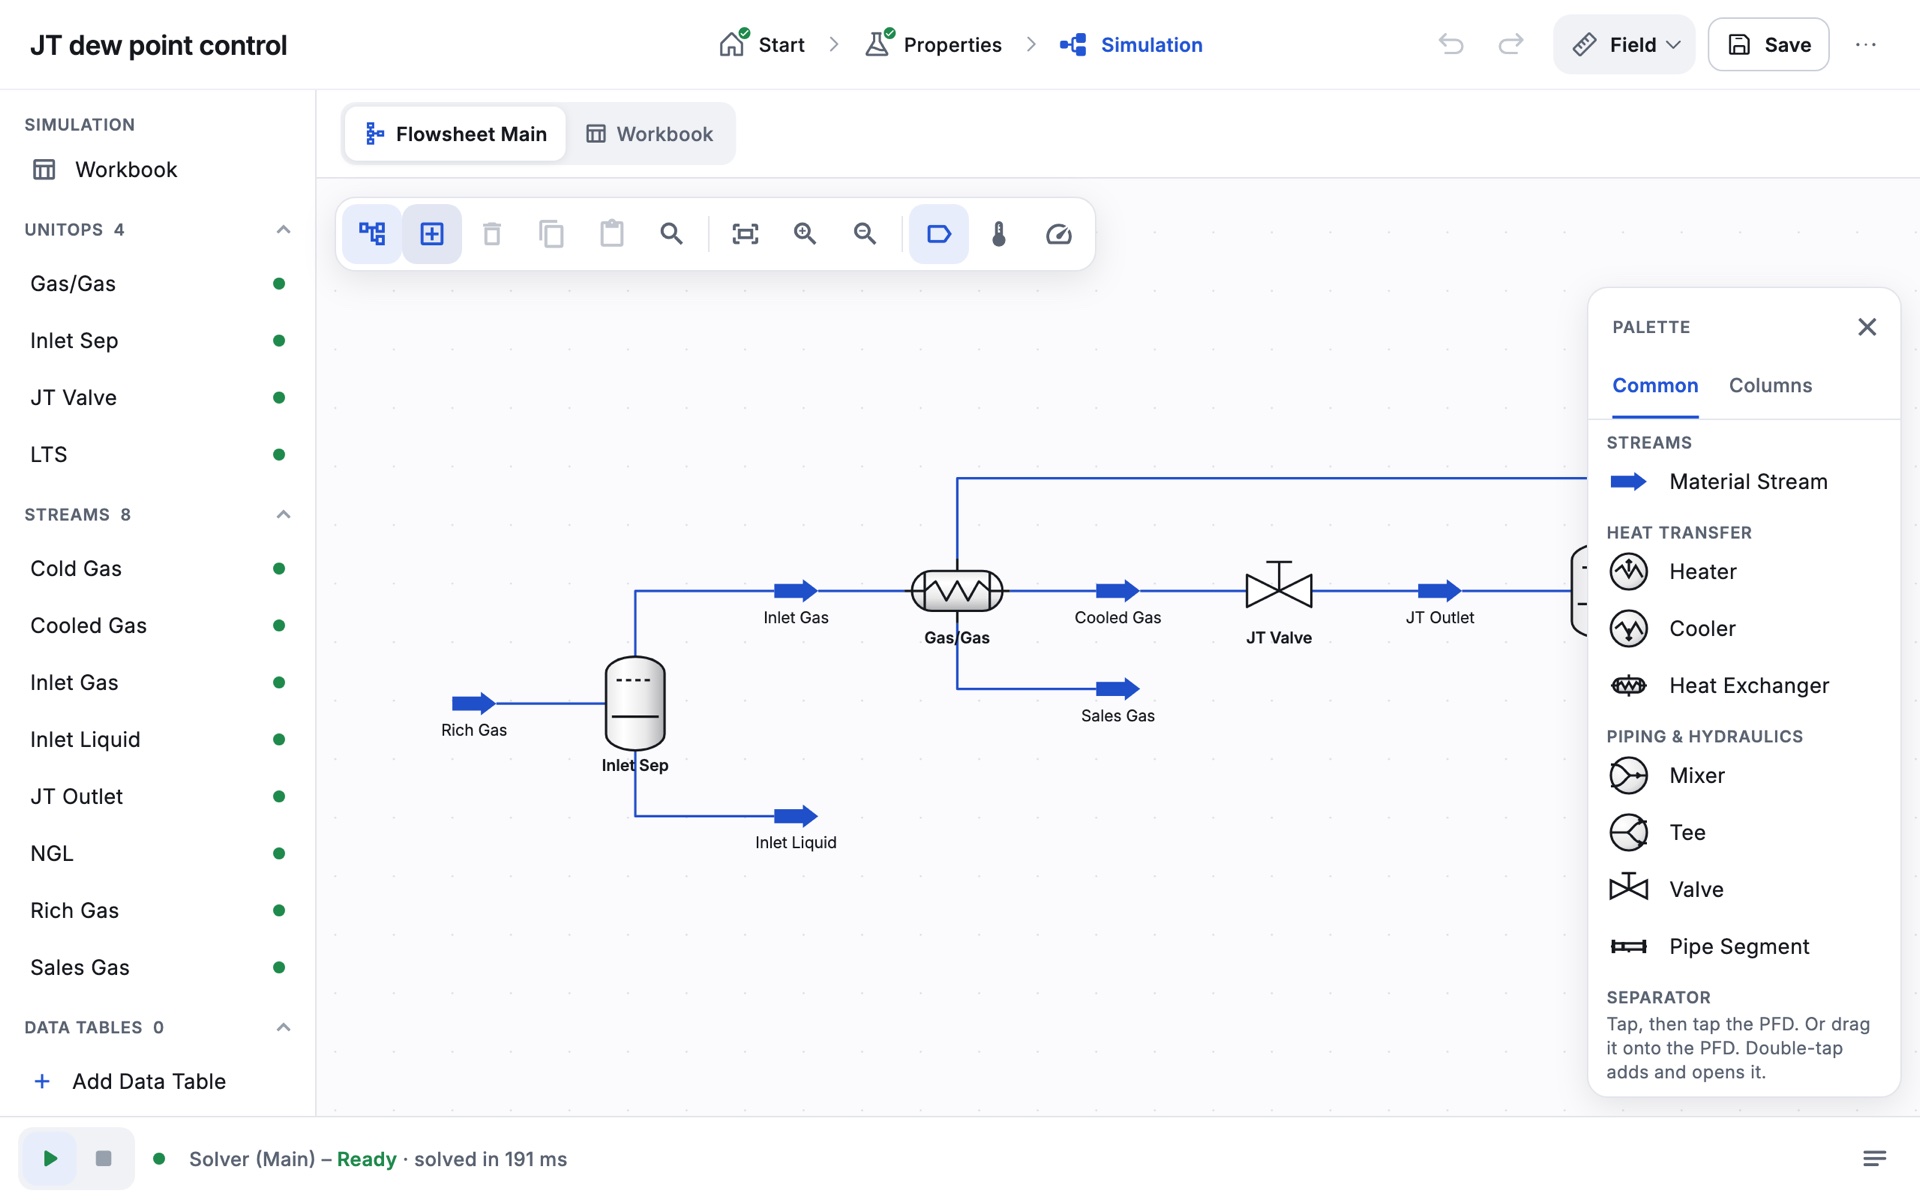
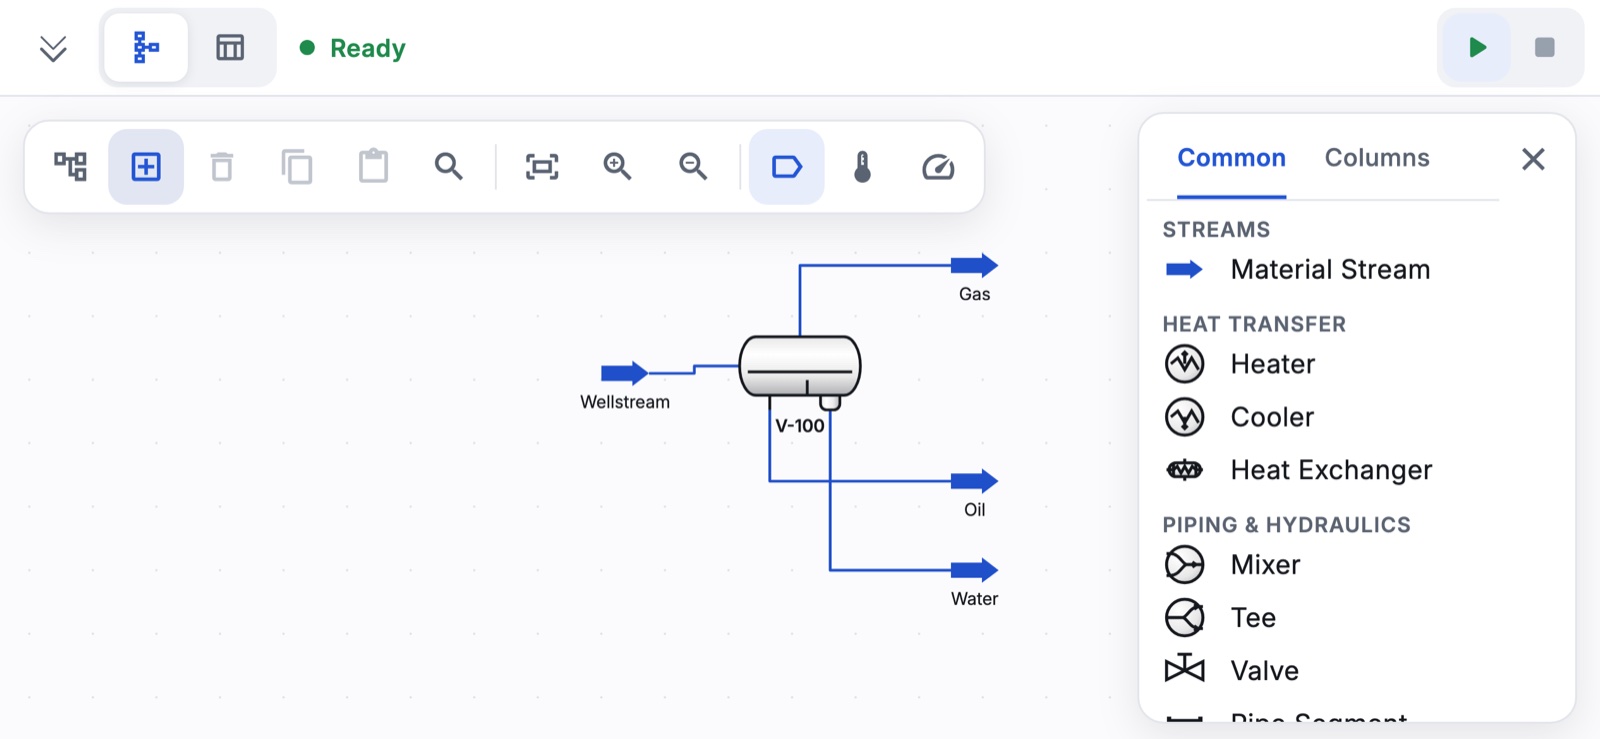
The palette floats over the right of the PFD. It has two tabs: Common, with objects grouped under Streams, Heat Transfer, Piping & Hydraulics, Separator, Pressure Changer and Manipulator, and Columns. There are three ways to add an object:
- Pick, then tap. Tap an object in the palette (it is highlighted), then tap the PFD where it should go. A bar at the bottom left reads Tap the PFD to place, with Cancel. Tap the same palette item again to cancel.
- Drag an object sideways out of the palette and drop it on the PFD. (Dragging up and down scrolls the list.)
- Double-tap an object to add it in the middle of the visible PFD and open it.
A new object is selected and its property view opens. Operations that need an energy stream get one automatically (Q-100, Q-101 and so on). Column types open the column Input Expert first (see Columns).
Close the palette with its ×, the toolbar button, F4, Esc or the Android back button. On a phone, picking an object closes the palette so the whole PFD is free for the tap that places it. In phone landscape the palette is compact and runs the full height of the screen.
With a keyboard, F11 adds a material stream in the middle of the PFD and F12 opens the palette.
Working on the PFD
- Tap an object to select it and open its property view. Tap empty space to clear the selection.
- Drag an object to move it. Objects snap to a small grid so layouts line up. Dragging a selected object moves the whole selection.
- Drag on empty space to pan. Pinch to zoom. With a mouse, the scroll wheel zooms.
- Long-press an object for its menu: Open, Rename…, Show Table or Hide Table (streams), Add to Selection or Remove from Selection, Rotate 90°, Mirror and Reset Orientation (operations), and Delete. Rotate and Mirror apply to every selected operation when the one you pressed is part of the selection.
- A stream table (temperature, pressure and mass flow) can be dragged to a new place on its own.
- With a mouse, resting the pointer on an object shows a short summary of its results.
Connecting streams
You can connect streams in two ways.
- In the property view. On the operation's Connections page, each port has a picker. Choose an existing stream, << New Stream >>, or << Type a name >> (a new name creates the stream; an existing name connects it). Ports that take several streams, such as mixer inlets, list them as chips with a remove button.
- On the PFD. Select an operation: handles appear on its free ports. Drag from a handle onto a stream to connect it, or onto empty space to create and connect a new stream (or a new energy stream on an energy port). Dropping on another operation does nothing except show a reminder.
Zalosim keeps the usual rules: a stream can be the product of only one operation and the feed of only one. If a connection breaks a rule, a red message says why.
Property views
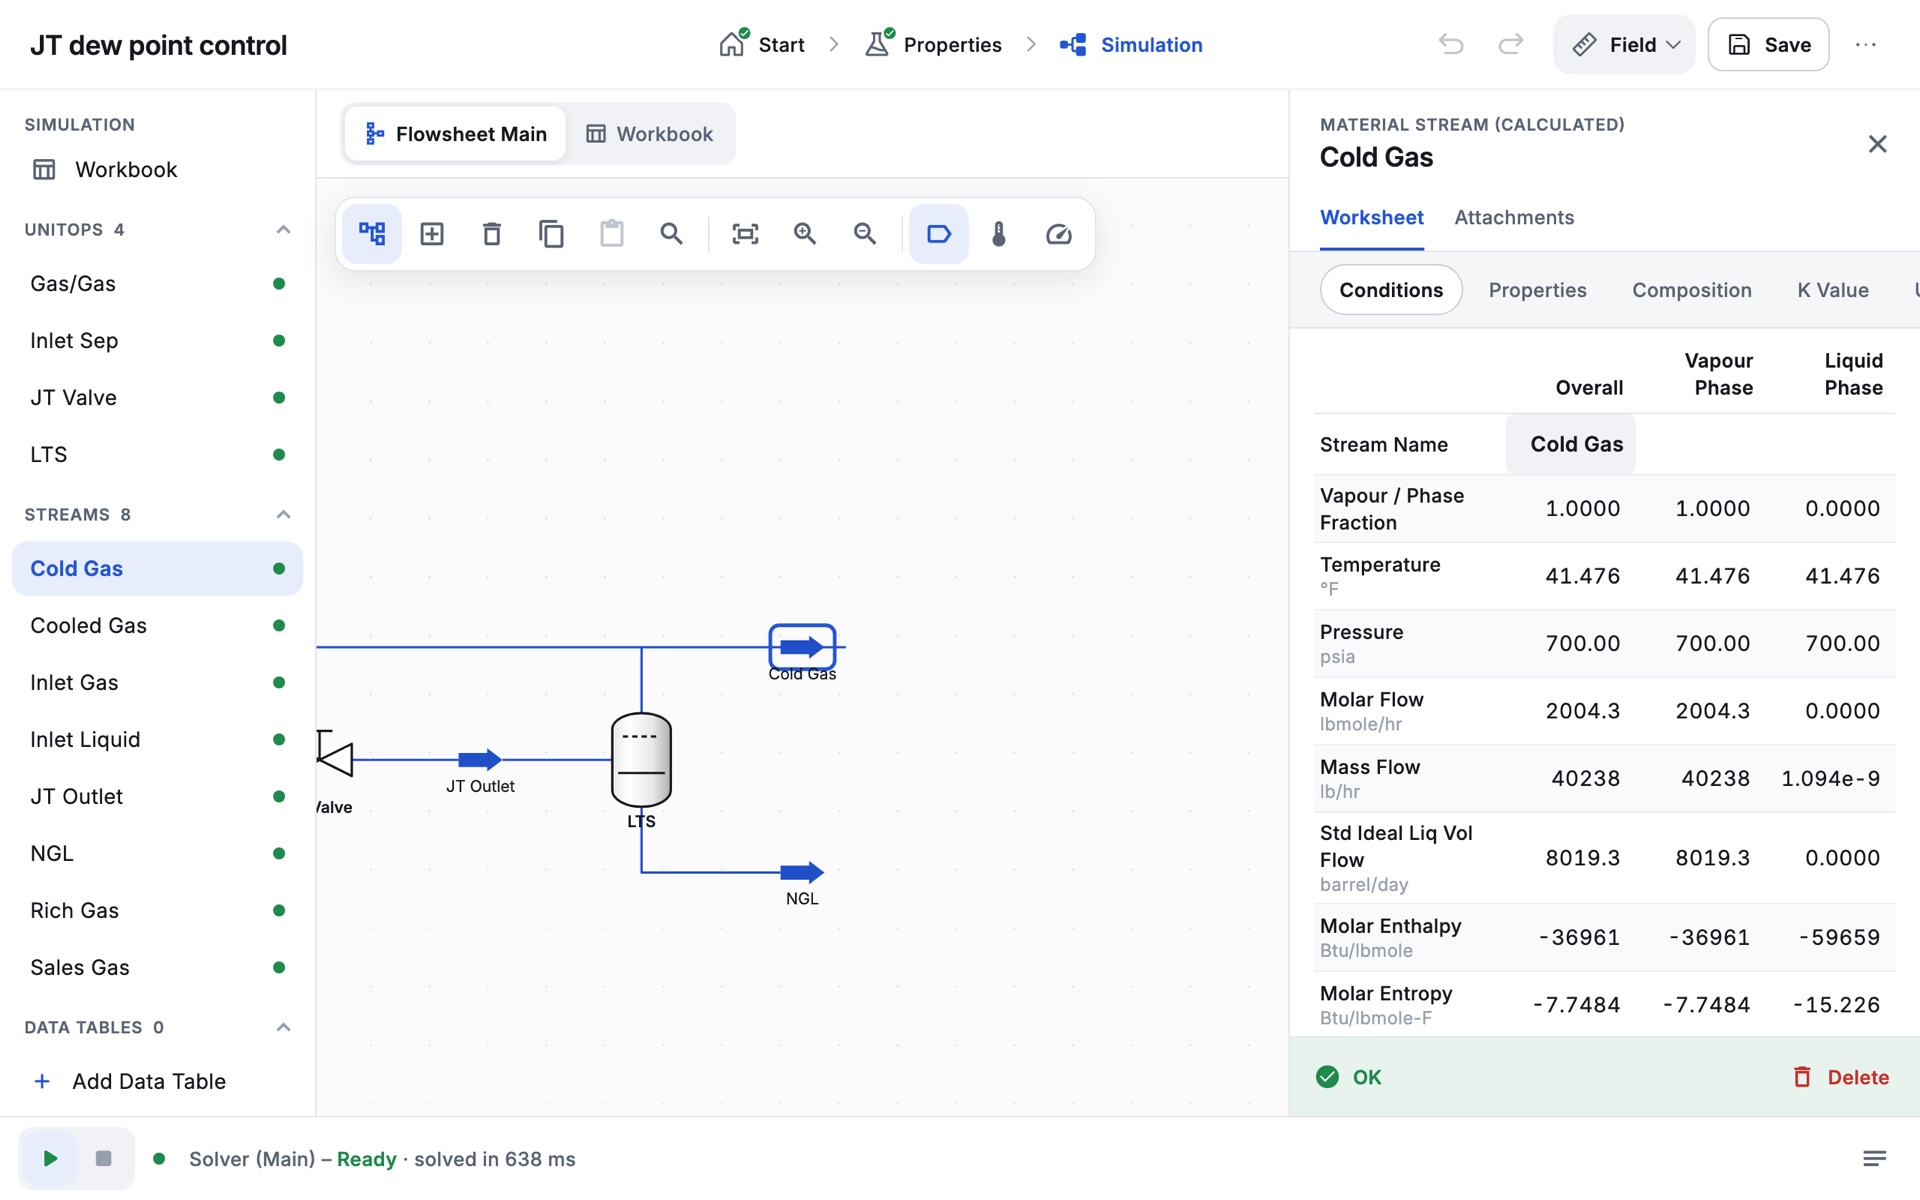
Every stream and operation has a property view. It opens beside the PFD on a landscape tablet, and covers the PFD on narrow screens (an upright tablet or a phone). It has:
- A header with the object type, its name and a close button (×, or Ctrl+F4).
- Tabs across the top. Unit operations usually have Design, Rating (where sizing applies), Worksheet and Performance; streams have Worksheet and Attachments. Ctrl+Shift+N and Ctrl+Shift+P step through the tabs.
- Pages inside each tab, such as Connections, Parameters, User Variables and Notes. They show as a list on the left, or as a row of chips when the view is narrow.
- A status strip at the bottom: green OK when solved, amber with what is missing (for example Unknown Delta P), red with the error, grey when ignored. Operations also have an Ignored tick box, which makes the solver skip them, and a Delete button.
To rename an object, tap its name on the Connections page (or on the stream's Conditions page), or use Rename in the long-press menu. Each object also has a User Variables page for your own values and a Notes page; both are saved with the case and printed in the PDF report.
Values follow one colour code everywhere: blue for values you entered, black for values Zalosim calculated, and grey <empty> for values not known yet. Tap a field with a light grey background to edit it with the keypad.
The solver bar
The bar along the bottom of the Simulation environment controls the solver.
- Go (green play button, Solver active) and Hold (stop button, Hold solver). While the solver is active, every change you make is solved straight away in the background. On hold, your changes are kept but nothing is recalculated until you press Go. F8 switches between the two.
- Status, after Solver (Main) –: Ready (green) when everything is solved, Holding when on hold, Calculating… while it works, Not solved, or a message naming what is not solved, for example 1 operation(s) not solved; VLV-100: Unknown Delta P. After each run it adds the time taken, such as solved in 85 ms.
- Cancel appears while a long solve is running and stops it without changing the case.
- Messages (button at the right) opens a log of recent solver messages, including each Adjust iteration.
Tablet layout
On a landscape tablet you see everything at once: navigator pane, PFD and the property view side by side, with the solver bar below. Held upright (narrower than 900 pixels), the property view covers the PFD while it is open; close it to get back to the drawing. The navigator pane gives way first whenever the PFD would get too small.
Phone layout
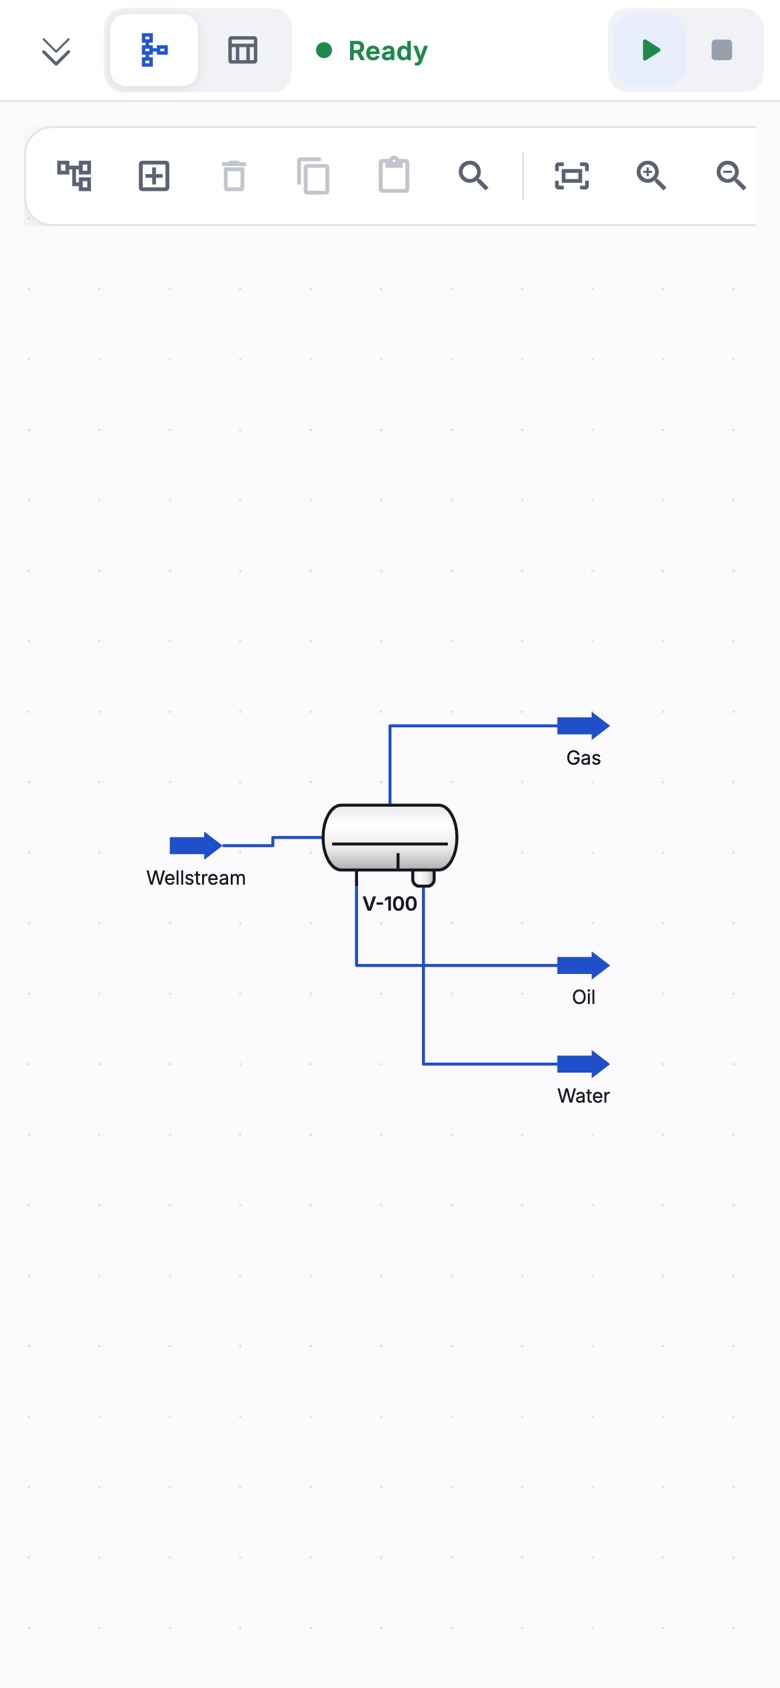
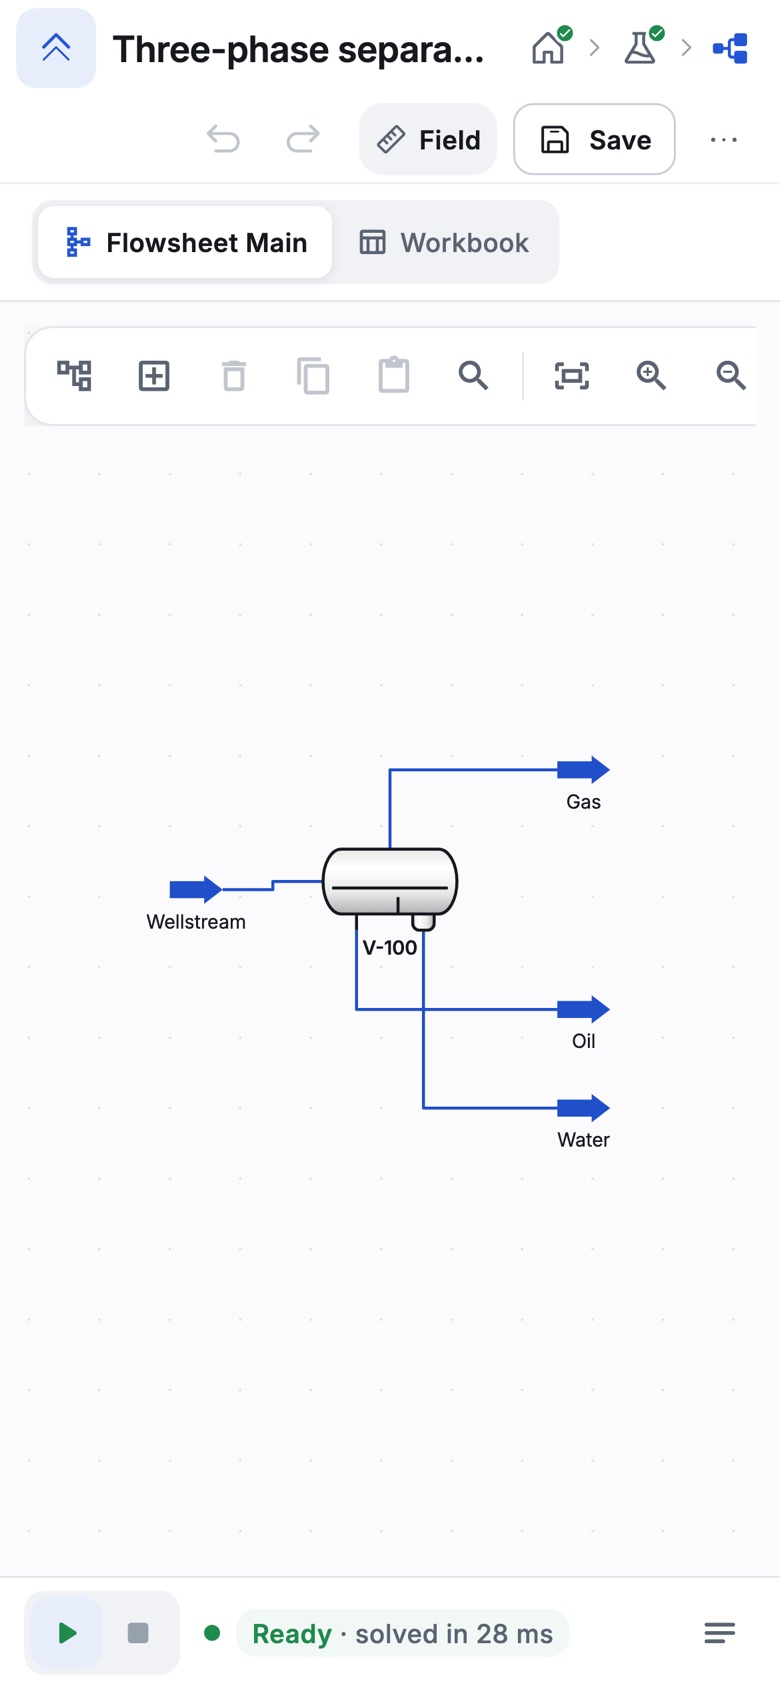
On a phone the Simulation environment hides the top bar and the solver bar so the PFD gets the screen. A compact bar keeps the essentials in reach:
- the toolbar toggle (double arrow, Show toolbars / Hide toolbars), which brings back the top bar and solver bar;
- icon buttons for Flowsheet Main and Workbook;
- the solver status with the Go and Hold buttons (and Cancel while solving).
Property views cover the PFD while they are open. The navigator pane starts hidden; use the toolbar button to show it if there is room. The Properties environment is laid out as on a tablet and scrolls in both directions. A guided exercise panel stretches along the bottom of the screen.
Zalosim turns with the phone. In landscape the palette is compact and runs the full height: